-

|
-

|
- Step 1:
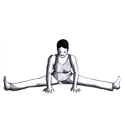
- Sit in Dandasana, then lean your torso back slightly on your hands and lift and open your legs to an angle of about 90 degrees (the legs should form an approximate right angle, with the pubis at the apex). Press your hands against the floor and slide your buttocks forward, widening the legs another 10 to 20 degrees. As with Dandasana, if you can't sit comfortably on the floor, raise your buttocks on a folded blanket.
- Step 2:
- Rotate your thighs outwardly, pinning the outer thighs against the floor, so that the knee caps point straight up toward the ceiling. Reach out through your heels and stretch your soles, pressing though the balls of the feet.
- Step 3:
- With your thigh bones pressed heavily into the floor and your knee caps pointing up at the ceiling, walk your hands forward between your legs. Keep your arms long. As with all forward bends, the emphasis is on moving from the hip joints and maintaining the length of the front torso. As soon as you find yourself bending from the waist, stop, re-establish the length from the pubis to the navel, and continue forward if possible.
- Step 4:
- Increase the forward bend on each exhalation until you feel a comfortable stretch in the backs of your legs. Stay in the pose 1 minute or longer. Then come up on an inhalation with a long front torso.
|
- Beginner's Tip:
- Upavistha Konasana is a difficult forward bend for many beginners. If you have trouble bending even a little bit forward, it's acceptable to bend your knees slightly. You might even support your knees on thinly rolled blankets; but remember, as you move into the forward bend, it's still important keep the knee caps pointing toward the ceiling.
- Modifications and props:
- Beginners might not be able to bring the torso forward toward the floor. Take a bolster or a thickly rolled blanket and lay it on the floor in front of you, its long axis perpendicular to your pelvis. Exhale into the forward bend and lay your torso down on this support.
- Deepen the pose:
- Advanced students can help themselves move into the forward bend. Perform steps 1 and 2 in the main description above. Then reach out and wrap your index and middle fingers around the big toes, each pair of fingers secured in place with the thumb. Pull back on the toes as you lean forward, but push actively through the bases of the big toes to keep the inner and outer ankles even. Bend your elbows out to the sides and lift them away from the floor as your torso descends.
- Partnering:
- A partner can help you get a feel for the action of the inner thighs in this pose. Perform steps 1 and 2 in the main description above. Wrap a strap on top of your left hip crease and around the left leg and have the partner, sitting off to your left side, hold the two free ends. She should press her right foot against your sacrum, her left foot against your outer left thigh. Then, as the partner pulls on the strap perpendicularly to the line of your thigh bone, exhale and turn your torso to the right. Feel, as you turn, how the strap drags the inner left groin away from (and so anchoring) the twist. Press your left hand on the floor between your legs, your right hand on the floor outside your right hip. Spend a minute twisting away from the deepening left groin, then release with an exhalation, and repeat on the other side. Finally, perform the full pose as described above. As your torso lengthens forward between your legs, pretend that each inner groin is being pulled away from that movement by an imaginary strap.
- Info
- upavistha = seated, sitting
kona = angle.
- Benefits:
- Stretches the insides and backs of the legs.
- Stimulates the abdominal organs
.
- Strengthens the spine
.
- Calms the brain
- Releases groins
- Therapeutic Applications:
- Contraindications and Cautions:
- Lower-back injury: Sit up high on a folded blanket and keep your torso relatively upright.
|


